All three kids chose characters from video games this year as their costumes. Colton and Lily wanted to be characters from game series called Zelda. The main character is Link. An Elven like warrior. Zelda is the princess. Of course having played the game in my twenties I figured, sure no problem!! What I wasn't aware of when I first agreed to this scheme was that in the specific incarnation of these characters that my children wanted to be Zelda wears jeweled armor! Here's a screenshot of Lily's chosen character:
So off I go to the internet to see if I can figure out how to make armor. Thankfully I found some amazing tutorials on http://www.deviantart.com/ ! While doing research for these costumes I was awed by the amazing talent out there in the cosplay world! Here are just a few examples of the posts I used to guide me in my quest for realistic looking costume armor and accurately depicted clothing:
- Zelda Twilight Princess armor tutorial
- Link's Bracer tutorial
- Zelda's Armor design templates
- Link's hat
So, after what seemed to me like days of research I bought the supplies and got to work! I started with Lily's armor because it seemed like the most time consuming of the two.
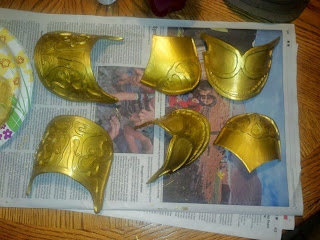
Using the templates I found I cut out and formed the base pieces of the Zelda shoulder armor:
I think it is so very cool that you can heat up the craft foam over a range top burner and get it to hold a form!!
After laboriously cutting out the detail pieces with an x-acto knife and gluing them to the base pieces I painted each piece front and back with 2 coats of Elmers Glue all mixed with some water and a bit of glossy decoupage. Then after that was dry I painted them gold using artists acrylic.
Then after two coats of gold paint, I rubbed a bit of watered down black over them to take down the "shine" a bit and make them look more like real armor. I did the same with the chest piece and added beads that were part of a necklace I found on clearance at a local accessory store. I used wire to help keep the top of the shoulder piece in the shape required and also to create loops to attach the chest piece to. Here's Lily trying on the finished shoulder/chest armor:
Following all the same steps I made her crown that I attached to some 16 gauge copper wire that I bought at the hardware store (it's WAY cheaper there than at a craft store btw). Here's the finished crown:
I found a long brunette wig at Goodwill and restyled it to match Zelda's hair style as best as I could. I think it turned out pretty good!
For Link's bracer I had to create my own template from pictures off the internet. Then, I followed the same process but instead of painting it I stopped at the glue/decoupage step because the finished piece needed to look like brown leather, and the craft foam was already brown.
For Link's hat and tunic I found great patterns online. The tunic was amazingly simple to create using one of Colton's t-shirts in order to get the basic shape.
Using a fake leather purse I found at Goodwill and an old belt I created Link's sword belt and his inventory belt. I also bought sand art necklaces and filled the bottles with colored water to make his potions.
Thankfully, I didn't need to make pants this year having already made brown faux suede pants for Colton's Robin hood costume.
In Part 2, I'll go over what I did to create Austin's costume and post the final results!


 BlogFrogUserID = 23681; BlogFrogBlogID = 1334523; BlogFrogColor = "6d9eb0"; BlogFrogN = 3; BlogFrogWidth = "150"; BlogFrogShowTop = "False";
No comments:
Post a Comment